If you’ve ever worked with web servers, you’ve probably heard of the LAMP stack — Linux, Apache, MySQL/MariaDB, and PHP. It’s one of the most popular setups for hosting dynamic websites and applications.
Most people install LAMP using ready-made packages from Ubuntu’s repositories. That’s quick and convenient, but it also means you’re limited to whatever options and versions the package maintainers provide.
In this guide, we’ll take things a step further and show you how to compile the LAMP stack from source on Ubuntu. Why would you do that? Because building from source gives you:
- More control over which modules and features get included.
- Performance improvements tailored to your server’s hardware.
- Early access to the latest versions and features before they hit package managers.
Don’t worry if this sounds a bit advanced — we’ll walk through each step clearly so you can follow along. By the end, you’ll have a fully working LAMP stack that’s customized for your needs.
Why Compile from Source?
Building from source allows you to:
- Enable specific compile-time options and optimizations
- Get the latest features before they’re packaged
- Create lightweight builds with only needed modules
- Optimize for your specific hardware architecture
- Apply custom patches and modifications
- Understand the software’s internals better
Prerequisites and System Preparation
System Requirements:
- Ubuntu 20.04+ with at least 2GB RAM and 5GB free disk space
- Root or sudo access
- Stable internet connection for downloading sources (approximately 1GB total)
- Basic familiarity with command-line operations
Install Build Dependencies
First, update your system and install essential build tools:
sudo apt update && sudo apt upgrade -y
sudo apt install build-essential autoconf libtool bison re2c pkg-config \
    cmake git wget curl libssl-dev libxml2-dev libcurl4-openssl-dev \
    libpng-dev libjpeg-dev libonig-dev libzip-dev libreadline-dev \
    libgmp-dev libldap2-dev libsqlite3-dev zlib1g-dev libpcre3-dev \
    libffi-dev libsodium-dev libwebp-dev libexpat1-dev libnghttp2-dev \
    libsystemd-dev
Create a dedicated build directory:
sudo mkdir -p /usr/src/lamp
cd /usr/src/lamp
sudo chown $(whoami):$(whoami) /usr/src/lamp
Step 1: Compile Apache from Source
Download and Extract Apache
# Download Apache HTTP Server
sudo wget https://downloads.apache.org/httpd/httpd-2.4.65.tar.gz
sudo wget https://downloads.apache.org/httpd/httpd-2.4.65.tar.gz.asc

# Verify integrity (optional but recommended)
gpg --verify httpd-2.4.65.tar.gz.asc httpd-2.4.65.tar.gz

# Extract
tar -xzf httpd-2.4.65.tar.gz
cd httpd-2.4.65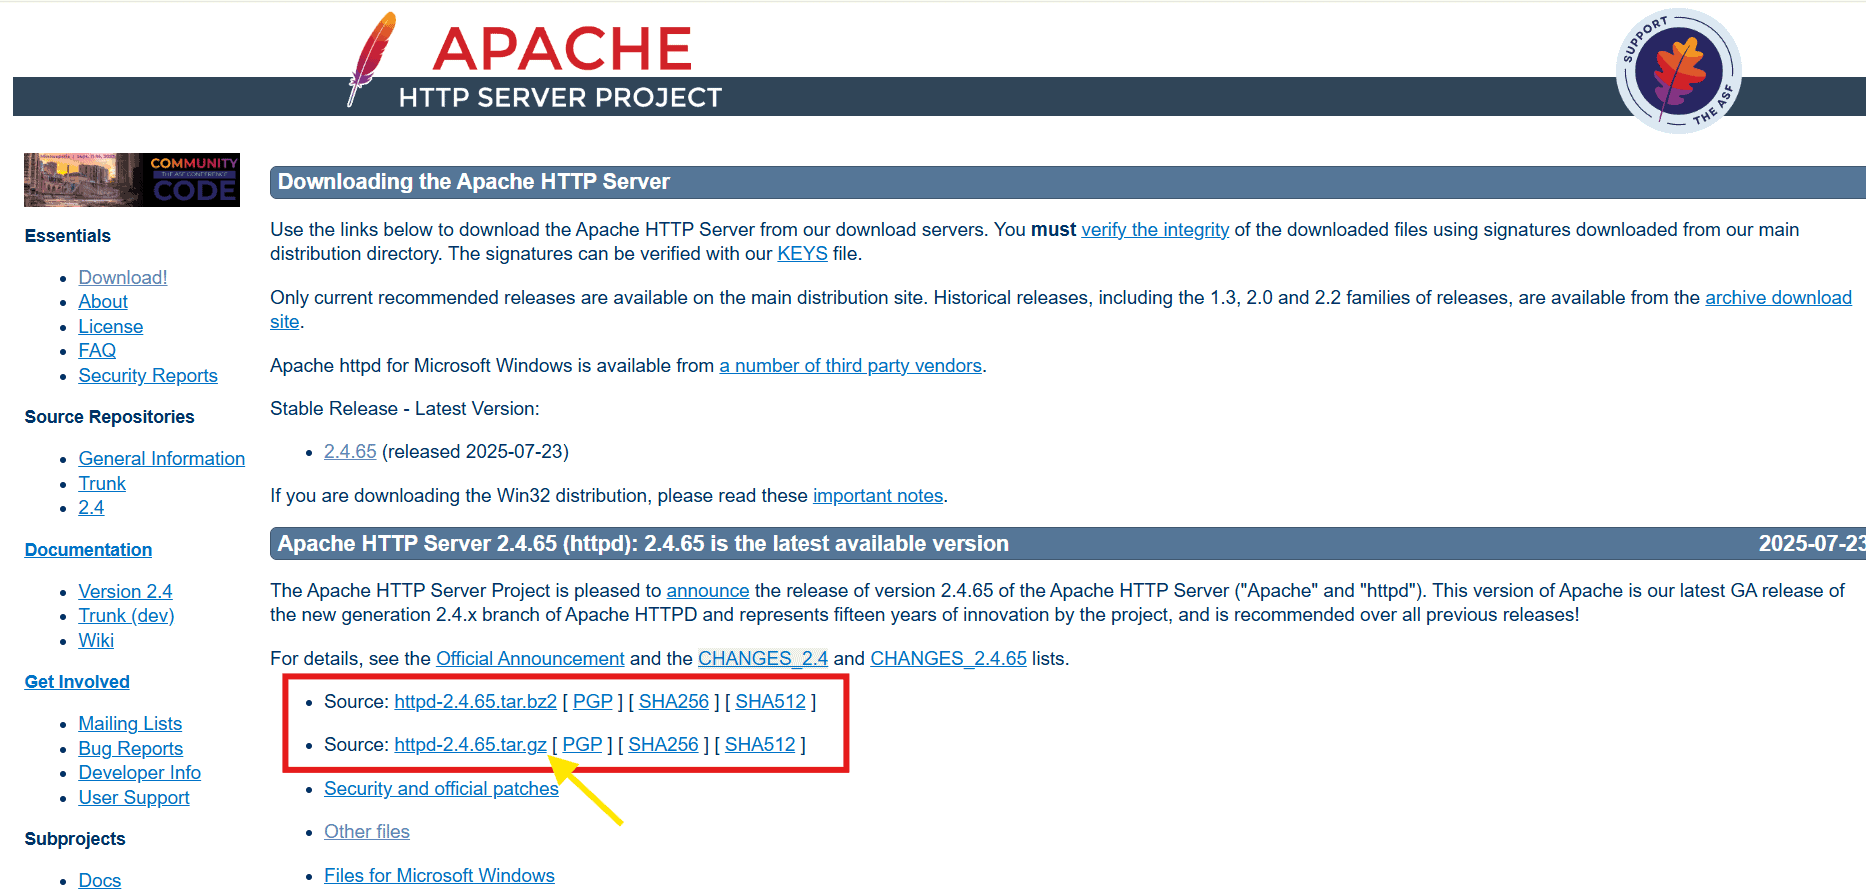
You can always download the latest stable version of Apache HTTP Server from the official download page.
Download and Install APR Dependencies
Apache requires APR (Apache Portable Runtime) libraries:
# Download APR and APR-Util
sudo wget https://downloads.apache.org/apr/apr-1.7.6.tar.gz
sudo wget https://downloads.apache.org/apr/apr-util-1.6.3.tar.gz

# Extract to srclib directory
tar -xzf apr-1.7.6.tar.gz
tar -xzf apr-util-1.6.3.tar.gz
mv apr-1.7.6 srclib/apr
mv apr-util-1.6.3 srclib/apr-util
Configure Apache Build
./configure \
    --prefix=/opt/apache2 \
    --with-included-apr \
    --enable-ssl \
    --enable-rewrite \
    --enable-deflate \
    --enable-headers \
    --enable-expires \
    --enable-mpms-shared=all \
    --enable-mods-shared=most \
    --with-pcre \
    --enable-http2 \
    --enable-proxy \
    --enable-proxy-http
Key Configuration Options Explained:
--prefix: Installation directory--with-included-apr: Use bundled APR libraries--enable-ssl: SSL/TLS support--enable-mpms-shared=all: All Multi-Processing Modules as shared--enable-mods-shared=most: Most modules as shared libraries
Compile and Install Apache
# Compile (this takes 5-15 minutes)
make -j$(nproc)

# Run tests (optional)
make test

# Install
sudo make install

# Set ownership
sudo chown -R $(whoami):$(whoami) /opt/apache2

# Create systemd service
sudo tee /etc/systemd/system/apache2-custom.service << 'EOF'
[Unit]
Description=Apache HTTP Server (Custom Build)
After=network.target

[Service]
Type=forking
ExecStart=/opt/apache2/bin/httpd -D FOREGROUND
ExecReload=/bin/kill -HUP $MAINPID
KillMode=process
Restart=on-failure
RestartSec=42s

[Install]
WantedBy=multi-user.target
EOF

sudo systemctl daemon-reload
sudo systemctl enable apache2-custom
⚠️ Note: Compiling Apache can take 10–15 minutes depending on your CPU. Be patient.
Step 2: Compile MariaDB from Source
Download MariaDB Source
cd /usr/src/lamp
wget https://archive.mariadb.org/mariadb-11.2.2/source/mariadb-11.2.2.tar.gz
tar -xzf mariadb-11.2.2.tar.gz
cd mariadb-11.2.2
Install MariaDB Build Dependencies
sudo apt install build-essential cmake pkg-config bison \
    libncurses5-dev libssl-dev zlib1g-dev \
    libboost-all-dev liblz4-dev libsnappy-dev \
    libpcre2-dev libsystemd-dev \
    libgnutls28-dev libevent-dev \
    libboost-dev libxml2-dev libjemalloc-dev \
    libmsgpack-dev libbz2-dev liblzma-dev
Configure MariaDB Build
# Create build directory
mkdir build && cd build

# Configure with CMake
cmake .. \
  -DCMAKE_INSTALL_PREFIX=/opt/mariadb \
  -DCMAKE_BUILD_TYPE=Release \
  -DMYSQL_DATADIR=/opt/mariadb/data \
  -DSYSCONFDIR=/opt/mariadb/etc \
  -DMYSQL_UNIX_ADDR=/opt/mariadb/tmp/mysql.sock \
  -DDEFAULT_CHARSET=utf8mb4 \
  -DDEFAULT_COLLATION=utf8mb4_general_ci \
  -DWITH_INNODB_LZ4=ON \
  -DWITH_INNODB_SNAPPY=ON \
  -DPLUGIN_ROCKSDB=NO \
  -DPLUGIN_TOKUDB=NO \
  -DWITH_SYSTEMD=yes
Compile and Install MariaDB
# Compile (this can take 20-60 minutes)
make -j$(nproc)

# Install
sudo make install

# Create mysql user and group
sudo groupadd mysql
sudo useradd -r -g mysql -s /bin/false mysql

# Set proper ownership
sudo chown -R mysql:mysql /opt/mariadb
sudo chmod 755 /opt/mariadb

# Initialize database
sudo /opt/mariadb/scripts/mysql_install_db \
    --user=mysql \
    --basedir=/opt/mariadb \
    --datadir=/opt/mariadb/data

# Create systemd service
sudo tee /etc/systemd/system/mariadb-custom.service << 'EOF'
[Unit]
Description=MariaDB database server (Custom Build)
After=network.target

[Service]
Type=notify
User=mysql
Group=mysql
ExecStart=/opt/mariadb/bin/mysqld --defaults-file=/opt/mariadb/etc/my.cnf
TimeoutSec=300
PrivateNetwork=false

[Install]
WantedBy=multi-user.target
EOF

sudo systemctl daemon-reload
sudo systemctl enable mariadb-custom
💡 Tip: Always run mysql_secure_installation to remove test users and improve security.
Step 3: Compile PHP from Source
Download PHP Source
cd /usr/src/lamp
git clone https://github.com/php/php-src.git --branch=PHP-8.3
cd php-src
Build Configuration Script
./buildconf --forceConfigure PHP Build
./configure \
    --prefix=/opt/php8 \
    --with-config-file-path=/opt/php8/etc \
    --enable-fpm \
    --with-fpm-user=www-data \
    --with-fpm-group=www-data \
    --disable-short-tags \
    --with-openssl \
    --with-pcre-regex \
    --with-zlib \
    --enable-bcmath \
    --with-curl \
    --enable-filter \
    --enable-ftp \
    --with-gd \
    --with-jpeg \
    --with-webp \
    --enable-intl \
    --enable-mbstring \
    --with-mysqli=mysqlnd \
    --with-pdo-mysql=mysqlnd \
    --with-readline \
    --enable-sockets \
    --with-sodium \
    --enable-soap \
    --with-zip \
    --enable-opcache \
    --with-apache=/opt/apache2
Key PHP Configuration Options:
--enable-fpm: PHP FastCGI Process Manager--with-mysqli: MySQL improved extension--with-pdo-mysql: PDO MySQL support--enable-opcache: Built-in opcode cache--with-apache: Apache SAPI module
Compile and Install PHP
# Compile (takes 5-20 minutes)
make -j$(nproc)

# Run tests (optional, takes time)
# make test

# Install
sudo make install

# Copy configuration files
sudo cp php.ini-production /opt/php8/etc/php.ini
sudo cp sapi/fpm/php-fpm.conf /opt/php8/etc/
sudo cp sapi/fpm/www.conf /opt/php8/etc/php-fpm.d/

# Create PHP-FPM systemd service
sudo tee /etc/systemd/system/php8-fpm.service << 'EOF'
[Unit]
Description=The PHP 8 FastCGI Process Manager
After=network.target

[Service]
Type=notify
PIDFile=/opt/php8/var/run/php-fpm.pid
ExecStart=/opt/php8/sbin/php-fpm --nodaemonize --fpm-config /opt/php8/etc/php-fpm.conf
ExecReload=/bin/kill -USR2 $MAINPID

[Install]
WantedBy=multi-user.target
EOF

sudo systemctl daemon-reload
sudo systemctl enable php8-fpm
Step 4: Integration and Configuration
Configure Apache to Work with PHP
Edit Apache configuration:
sudo nano /opt/apache2/conf/httpd.confAdd these lines:
# Load PHP module
LoadModule php_module modules/libphp.so

# Configure PHP
<FilesMatch \.php$>
    SetHandler application/x-httpd-php
</FilesMatch>

DirectoryIndex index.html index.php

# PHP configuration
<IfModule mod_php.c>
    AddType application/x-httpd-php .php
</IfModule>
Create Basic Virtual Host
sudo mkdir -p /opt/apache2/htdocs/example.com
sudo tee /opt/apache2/conf/extra/example.com.conf << 'EOF'
<VirtualHost *:80>
    ServerName example.com
    DocumentRoot /opt/apache2/htdocs/example.com
    ErrorLog logs/example.com_error.log
    CustomLog logs/example.com_access.log combined

    <Directory "/opt/apache2/htdocs/example.com">
        AllowOverride All
        Require all granted
    </Directory>
</VirtualHost>
EOF
Start Services
# Start MariaDB
sudo systemctl start mariadb-custom

# Secure MariaDB installation
sudo /opt/mariadb/bin/mysql_secure_installation

# Start PHP-FPM
sudo systemctl start php8-fpm

# Start Apache
sudo systemctl start apache2-custom
Test Installation
Create a test PHP file:
sudo tee /opt/apache2/htdocs/index.php << 'EOF'
<?php
phpinfo();
// Test database connection
try {
    $pdo = new PDO('mysql:host=localhost', 'root', 'your_password');
    echo "<h2>Database connection: SUCCESS</h2>";
} catch (PDOException $e) {
    echo "<h2>Database connection: FAILED</h2>";
}
?>
EOF
Visit http://localhost to verify everything works.
Conclusion
Compiling the LAMP stack from source may take more time than running a few apt install commands, but the payoff is huge. You’ll gain:
✅ A faster, leaner web server environment
✅ The freedom to enable only what you need
✅ A deeper understanding of how your stack actually works
That said, managing a custom-compiled LAMP setup also means staying on top of updates, security patches, and maintenance. If you want the performance and flexibility of a source-built stack without the hassle of managing it all yourself, that’s exactly what we do at Veeble Hosting.
Our managed hosting services come with pre-optimized LAMP environments, security hardening, performance monitoring, and 24/7 expert support — so you can focus on building your applications instead of fighting with server configurations.